DBT Cloud - Create a Project w/ Azure DevOps Repository
/Projects in DBT are much like projects in any other IDE, think Visual Studio projects for example. A project will organize datastore connections, repository relationships, and all assets developed in that project such as DBT models, unit tests, configurations, etc. Before we can start working in DBT we first need to create a project.
This guide is for DBT Cloud, Snowflake, and Azure DevOps for your code repository. In the DBT documentation they suggest you would need the DBT enterprise licensing to connect to an DevOps repository, but that is only through HTTPS. We can still connect to a DevOps repository using SSH and we can do this at the standard licensing level of DBT.
This guide was written on 2023.02.10.
Project Configuration
First we need to navigate to your DBT cloud instance @ https://cloud.getdbt.com/
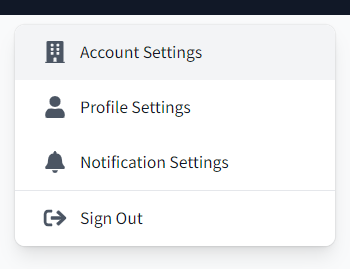
Make sure you are logged in to your account and once you are logged in, look to the top right hand corner of the DBT interface in your browser and you will see a blue gear, click that and then click the Account Settings option (the naming is not intuitive here, but the cloud interface will likely improve as the product matures).

On the Account Settings page, the first main section on this page will list all of the projects you have created. Click the New Project button to configure a new project, this will bring you to the project setup page.

The first option is to set the name of your project so give it a name that makes sense for the purpose or business system it serves. We have named our project MY_TEST_DBT_PROJECT for our example here. Once you have selected a name click the Continue button.

Next we want to choose our datastore (what DBT calls a warehouse), we are using Snowflake for this example. Select the target datastore and click next, this will take you to the configure your environment page.

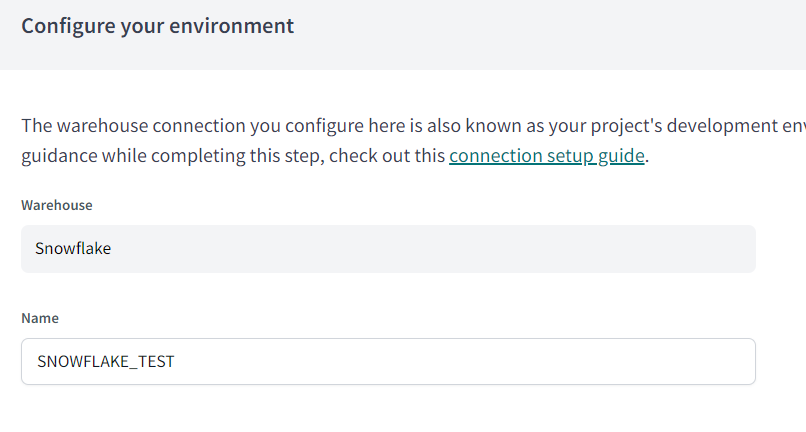
The configure your environment page refers to the datastore configuration, this means everything we need to connect DBT to Snowflake. The warehouse will are configuring is Snowflake and it resides is Azure. Give the connection a name, we will name ours SNOWFLAKE_TEST.
As we move down to the Settings section, the first option is Account--this is your Snowflake account instance. If you have any firewalls enabled for your Snowflake instance, apply inbound filtering rules as needed. Configuring IP access is beyond the scope of this guide.
You can find your Snowflake account by pulling up your Snowflake instance in a browser. In the URL example below we have highlighted the part of the URL that describes the Account. We have to rearrange it to look like wc16274.east-us.azure and then enter that in the Account field.
"https:/app.snowflake.com/east-us.azure/wc16274/worksheets" is the URL, then your account will be wc16274.east-us.azure

Once we have entered the Account name, we are ready to move on to the Optional Settings section. While this says optional you will want to fill this out. For your Role, choose a security role you have defined in your Snowflake instance. In our example here we have a role named DATA_TRANSFORMER. For the Database, enter the target database you want to connect to in your Snowflake instance. Finally, for the Warehouse option, enter the appropriate compute warehouse you defined in Snowflake. I would leave the Session Keep Alive option unchecked. Your configuration should look something like the following.

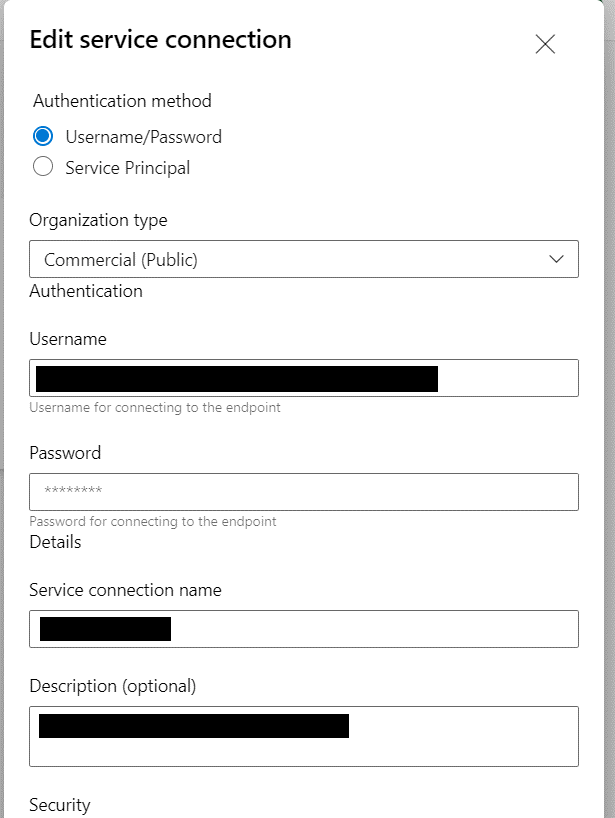
The next section we need to configure is the Development Credentials section. This is where we configure the security credentials dbt will use to connect to the Snowflake instance for new development. Our Auth Method is Username & Password, but you can also use key pair if desired. Enter the Snowflake username and password for the account you want DBT to use to access your Snowflake instance. For the Schema option, this is the schema DBT will write to when you are working in your development environment. Depending our your team composition, how many people are working in DBT, you may want to tweak this to be more personalized. Here we are setting a generic schema of dbt_elt.
Make sure the user account and schema have already been setup in Snowflake. As for the Target Name and Threads options, I would leave these as the default for now. Here is what this section will look like.

Now you are ready to test your configuration. Click the Test Connection button at the bottom right of the page.

This will bring up a testing indicator. If you set this up correctly your testing should pass and we are ready to move on to the last section, Setup a Repository. This is where we are going to establish the relationship between our Azure DevOps repo and DBT. To do this we are going to use SSH.
Connecting to DevOps Repository
This section is a little more involved because we need to do a few things in Azure DevOps to get this working. Select the Git Clone option. DBT is asking for the SSH git URL which we will get from DevOps. Once we have the SSH git URL, DBT will create the public key that we will then load back to DevOps. This is how we build the relationship between the two systems.

Navigate to your target DevOps repository and click the Clone button in the top right of the landing page. There are two options, HTTPS and SSH, select SSH and then copy the URL DevOps generates.

Now that we have the target SSH URL we need to enter this in to DBT. Go back to the DBT configuration screen for the repository, make sure git clone is still selected, and then enter the SSH URL we copied from DevOps and click the Import button. DBT will generate an SSH key for us that will allow us to communicate with DevOps. We need to load this SSH key to Azure DevOps so, copy the key and navigate back to your DevOps site.

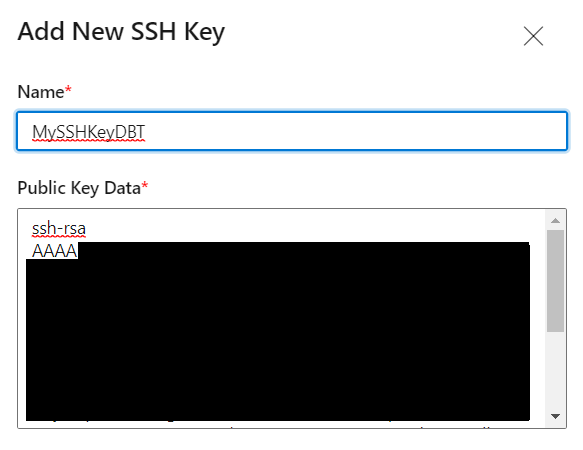
In DevOps, in to top right corner, there is a person icon with a gear next to it. These are your personal settings and where you want to define the key. Click the icon and then select the option SSH public keys.

Click the New Key button, provide a name, and then paste the key you copied from DBT. When you are done click the Add button at the bottom of the page. You should see this in your list of public keys now in DevOps.
Go back to the DBT configuration page and click the Next button, this will complete the setup of your project.