Getting Started With DBT - Development Primer
/In our previous guide DBT Cloud - Create a Project we learned how to build our first project in DBT, connect to our Snowflake database, and connect to our Azure DevOps repository. Now that we have our project and repo setup we are ready to begin development. This guide will walk you through the basics, a primer on how to get started working in DBT.
* All work we are doing is in the DBT cloud.
Navigating Your Project
In the top right corner of the DBT cloud interface you will see your organization name and a drop down list--this will contain a list of all projects in your organization. When you select a project, this will change the context of the Develop, Deploy, Environments, and Jobs options to the selected project. Before we can start modifying our project we first need to create our credentials for the target project. Any permissioned user in your DBT environment will still need to create credentials for the target project they want to work in before they can access the project through the Develop interface.
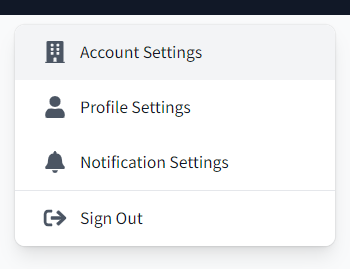
Click on the gear icon in the top right corner of the DBT cloud interface and select the Account Settings option. Once you are in Account Settings you will see other options to do things like create a project or set credentials. Since we already created our project in the previous guide, now we are ready to create our first set of development credentials for our project.

In the Credentials section you should see a list of all projects in your environment.

Click the target environment and this will bring up options to establish your development credentials.

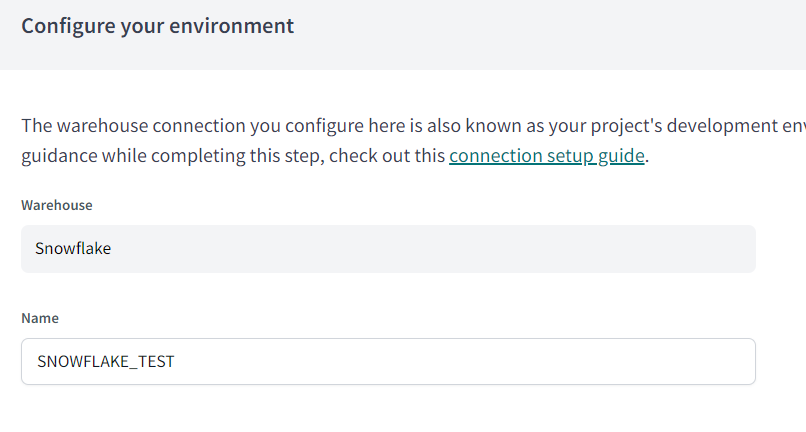
If your target database is Snowflake for example, then you should configure your Development Credentials with the credentials you access Snowflake with. So enter the username and password for your Snowflake login and for the schema, we want to specify a name that lets us know from where, who, and what project. In DBT, in your development environment, when you materialize tables or views those objects are created in the schema you specify in your project development credentials. When you move in to production, these objects will materialize in the schema defined in your environment, more on that later.
I like to follow a naming pattern as such: <SOURCE_PERSON_PROJECT>. So let's say our project is named Accounting_Datamart, the schema I would enter is DBT_BHETT_ACCTMART. The system generating the object is DBT, BHETT is an abbreviated user name, and ACCTMART as an abbreviated project name. Once you start working across many projects this will start to make more sense--the goal here is to accurately track what assets you have created in DBT and what project they belong to. Once you are finished creating your development credentials there is one more step before we can start working in our project and that is to create the first environment. In the top navigation bar, click the Deploy dropdown and then select Environments.

On the Environments page click the Create Environment button.

For our first environment we are going to create a development environment.

Give your environment a name and select Development for the Environment Type. For DBT version I would always try to use the latest. Save that and we are now ready to start working in the project. In the top navigation bar, click the Develop button.

Once the environment loads up you will see something that looks like the following.

Since we already created a relationship between DBT and DevOps when we built the project, all branching and merging is managed by DBT. When you click the Create branch button and create a development branch, DBT will create that in the remote repository and then check it out for you--all changes will be captured in this branch. When you are done with your development you can simply commit your changes in DBT and it will commit and sync them with your remote repository--DBT is acting as your git client here. You can also merge your development branch to main from DBT, but you should put in controls that prevent this behavior for the same reasons you prevent developers from merging to main anywhere else.
Notice all the folders and files in your file explorer, this is where you will build and organize the content for your project. The most important folder in your project is going to be your models folder, this is where you define all the SQL transforms for your data; how you organize this data will determine whether or not DBT is building views or physical tables--we will come back to.
First let's talk about the yml files. Yml files are configuration files that let you instruct behaviors and configurations in your project, models, tests, etc., and the most important of these at this point is your dbt_project.yml file. The project configuration file can be used for many different types of configurations as seen in the following link.
https://docs.getdbt.com/reference/configs-and-properties
We are going to focus on some basic configurations for your project file. The project.yml file will already have some content when you open it, it will look something like this.
# Name your project! Project names should contain only lowercase characters
# and underscores. A good package name should reflect your organization's
# name or the intended use of these models
name: 'dbt_My_Project'
version: '1.0.0'
config-version: 2# This setting configures which "profile" dbt uses for this project. profile: 'default'# These configurations specify where dbt should look for different types of files.
# The `source-paths` config, for example, states that models in this project can be
# found in the "models/" directory. You probably won't need to change these!model-paths: ["models"]
analysis-paths: ["analyses"]
test-paths: ["tests"]
seed-paths: ["seeds"]
macro-paths: ["macros"]
snapshot-paths: ["snapshots"]
target-path: "target" # directory which will store compiled SQL files
clean-targets: # directories to be removed by `dbt clean`
- "target"
- "dbt_packages"# Configuring models
# Full documentation: https://docs.getdbt.com/docs/configuring-models
# In this example config, we tell dbt to build all models in the example/ directory
# as tables. These settings can be overridden in the individual model files
# using the `{{ config(...) }}` macro.models:
dbt_My_Project:
datamart:
materialized: table
intermediate:
materialized: view First you have the name of your project, you'll want to provide a name that accurately describes the project and you will then use this name in other configurations in your yml file. The next most important section is the paths section. This is what tells DBT where to look for certain types of files. I would leave this as-is for now and make sure you are creating content where DBT expects it (we will get in to this more later on). Finally, for your initial configuration you will want to start setting your materialization strategy. Setting materialization means instructing DBT what to do with your model definitions, which means creating tables or views.
In my file explorer I have created two folders under the model folder named datamart and intermediate.

For all SQL definitions in my intermediate folder I would like to have those rendered as a view, and for all SQL definitions in my datamart folder I would like those rendered as tables. In this configuration intermediate is my stage and datamart is the final dimensionalized object that reporting consumers will pull data from. I first write the SQL to transform the source data, denormalize, define custom attributes, create composite keys, etc. That is what we write to a view. Then we pull the data from that view and create references to the view and other views so that it creates a lineage for us and instructs DBT in what order things need to be built.
In the configuration file example above you will see the section named models. This is followed by the project name we assigned at the top of the project.yml file and then one entry for the datamart folder and another for the intermediate folder along with the materialization strategy of table or view. This is how you configure materialization for your project.
* Important note - proper indentation and formatting of the yml file is necessary in order for the file to be parsed correctly. Anytime you are following a guide on configuring yml files, make sure you are following the exact formatting laid out in those guides.
Lets go ahead and create our first branch, add folders to our project, modify the project.yml file, and create the first SQL transform file. Click the Create branch button and provide a name for the new branch.

In the models folder in your project File Explorer create two new folders named intermediate and datamart, make sure both of these reside one level under the models folder like shown in the previous image. Now we are ready to modify the project.yml file. Click the file and we are going to make a few changes. First, give you project a name in the configuration file, we are going to name ours "dbt_my_project".
name: 'dbt_my_project'
version: '1.0.0'
config-version: 2Now we are going to define materialization for the new folders we created, add this section to your project.yml file and click the save button in the top right corner.
models:
   dbt_My_Project:
      datamart:
         materialized: table
      intermediate: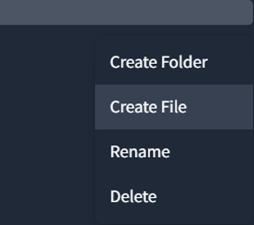
materialized: view The last thing we need to do is to create our first SQL file. Highlight the intermediate folder and click the ellipses to the right and add new file.
Name this something like vw_stage_customer.sql or the name of a table in your target datastore, prefix with vw_ to communicate the materialization of the object, a view. Now write a simple query that returns a few rows and then click the save button in the top right of the screen.
Now we are going to create a file in the datamart folder, you can name this one something that better aligns with its role, something like dim_customer.sql, this one will be materialized as a table. For your query, write a select statement that calls all the columns you defined in your view and this brings us to the last and most important steps to get up to speed in DBT. Now we are going to add a reference and a surrogate key. First the ref function, more detail here.
https://docs.getdbt.com/reference/dbt-jinja-functions/ref
Keep in mind, the ref function is a key feature in DBT. This is what allows you to build a lineage that is easy to understand and also instructs build order when your models are run. If you stick to the naming above, you can add your ref in your dim_customer.sql query like this.
 SELECT
     CustomerId
    ,CustomerName
    ,StartDate
 FROM {{ref('vw_stage_customer')}}
For more details please refer to the DBT documentation, but this will get you the reference behavior that is central to the product. The last thing we want to do is to add a surrogate key, this is going to be a hash value key (not here to debate the merits of miisk vs hash keys). Before we can add the surrogate we first need to install the utilities that enable the surrogate key function. This is also another central feature to the DBT project, the ability to leverage libraries created by the community.
First thing we need to do is to install the dbt utility collection, instructions can be found here:
https://hub.getdbt.com/dbt-labs/dbt_utils/latest/
With that installed we are now ready to add the surrogate key function. Lets say we want to add a surrogate key based on the natural key CustomerId. This is how we would do that.
 SELECT
    {{ dbt_utils.generate_surrogate_key(['CustomerId']) }} AS CustomerId_sk
    ,CustomerId
    ,CustomerName
    ,StartDate
 FROM {{ref('vw_stage_customer')}}
You can add more than a single field in the surrogate key generator. All fields will be separated automatically using a hyphen and that will be included in the hash key. So something like CustomerId, CustomerName would be rendered as CustomerId-CustomerName and that is the value that the hash is based on.
That should be enough to get you started in DBT. This is just a primer to get you up and running quickly, but there is still so much more to explore with the product. Advanced configurations, tests, and documentation are some of the other areas you will want to get up to speed in, but that will come in time as you use the product and have the need to implement those features.